Kubernetes tutorial
3. Provision infrastructure with Terraform
We will store the infrastructure state in the volume storage created previously, so any other person trying to work with this infrastructure will have access to it. Also, when executing changes, the state will be locked, preventing other users to try to change infrastructure at the same time.
Change to the infra directory. You will find several files and folders:
backend.tfconfig: parameters for the resource group and volume name that will store the infrastructure stateterraform.tfvars: input values to define a prefix* for all resource names, and default datacenter locationvariables.tf: inputs definitions, including the ones for theterraform.tfvarsvalues, and the service principal id and secret.main.tf: main Terraform file that references all other modulesoutputs.tf: output variable definitionsmodules(folder)acr(folder): files to define an Azure Container Registry provisioningaks(folder): files to define an Azure Kubernetes Service provisioningload_balancer(folder): files to define load balancerpublic_ip(folder): files to define a public IP addressresource-group(folder): files to define a Resource Group provisioning
*The “prefix” must contain only alphabetical characters, because it is used for the name of the Azure Container Registry, and that only allows this kind of characters (no numbers, dashes or underscores).
Initializing Terraform and state storage
To continue you must already have logged in with the Azure CLI, and have the environment variable ARM_ACCESS_KEY set up as explained earlier.
Initialize Terraform’s Azure driver using the backend.tfconfig backend configuration options to use the Azure storage for the infrastructure state, using:
$ cd infra
$ terraform init -backend-config=backend.tfconfig
Testing execution plan
We can test the execution plan without making any change to infrastructure with:
$ terraform plan
Provisioning the infrastructure
To continue you must have defined the environment variables TF_VAR_client_id and TF_VAR_client_secret as explained previously.
Provision the changes to infrastructure in your Azure account, use:
$ terraform apply
You will be shown the plan again, and asked for confirmation to continue. The provisioning process will last more than 10 minutes. At the beginning of this process, the plan will be saved on the Azure storage created previously, and the file marked as ‘locked’, so anybody else using the same plan will be prevented to do changes to infrastructure until you finish.
At the end you will be shown an output like this:
...
Apply complete! Resources: 5 added, 0 changed, 0 destroyed.

The state of your infrastructure has been saved to the path
below. This state is required to modify and destroy your
infrastructure, so keep it safe. To inspect the complete state
use the `terraform show` command.

State path: terraform.tfstate

Outputs:

acr_password = <sensitive>
acr_uri = systestacr.azurecr.io
acr_user = SysTestAcr
client_certificate = <sensitive>
client_key = <sensitive>
cluster_ca_certificate = <sensitive>
host = https://systest-k8s-XXXX.hcp.westeurope.azmk8s.io:443
id = /subscriptions/XXXXXXXXX-XXXX-XXXX-XXXX-XXXXXXXXXXXX/resourcegroups/SysTest-k8s-resources/providers/Microsoft.ContainerService/managedClusters/SysTest-k8s
kube_config = <sensitive>
resource_group_name = SysTest-k8s-resources
Some of the output variables are hidden because they were marked as sensitive, but all of their values have been written inside the Terraform state object in the remote Azure storage. That storage is encrypted at rest, and can only be accessed using the Azure CLI or the Azure Portal with your login credentials, or using the ARM_ACCESS_KEY environment variable that we retrieve from Key Vault also using Azure CLI and your login credentials.
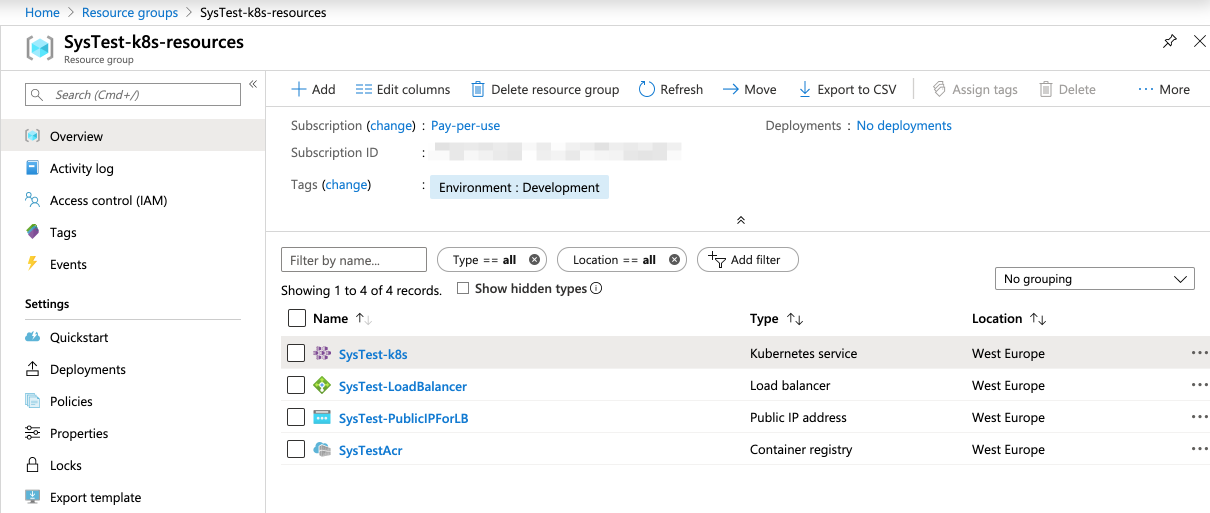
You will now have on your Azure account:
- An storage group, that holds the rest of the resources
- An Azure Container Registry to store the images of the microservices containers
- A public IP assignment
- A load balancer assigned to that public IP
- An Azure Kubernetes Service managed cluster, using the previous load balancer
You could omit the creation of the public IP and load balancer, as those resources would be automatically provisioned for your cluster. But when you provision them in an explicit way, if you later remove the Kubernetes cluster to replace it for a different one, you will maintain the same IP address.
Several additional resource groups will appear on your Azure account, that are automatically created to be able to serve your Kubernetes cluster requirements.
Improvement: You could create the service principal using also Terraform, example.
Improvement: You could also provision a Log Analytics resource for the cluster, example.
Improvement: Use workspaces to define different parameters for a production and development Kubernetes environment, more info.